

Building an Outdoor Kitchen: What the Process Actually Looks Like
From bare patio to outdoor kitchen: how the build actually unfolds
A stage-by-stage look at what building an outdoor kitchen really involves, from site prep to final inspection.
Plan your outdoor kitchen with a specialist
Talk to a designer about your outdoor kitchen project and get a clear picture of what the build will involve.
Why outdoor kitchens are closer to additions than backyard projects
Most homeowners approach an outdoor kitchen the way they might approach buying a grill: pick a spot, choose a product, and set it up. The reality is different. A built outdoor kitchen involves a foundation or prepared paver base, a framed structural island, utility connections that require licensed tradespeople, and finish materials chosen for year-round weather exposure. That combination puts it closer in complexity to a home addition than to a backyard improvement project.
The implication is practical: decisions made early, particularly about location, utility routing, and framing material, shape every stage that follows. Changing the location of a gas line after framing is underway is expensive and disruptive. Getting those decisions right before construction starts is where most of the real planning work happens. If you are still in the ideas phase, exploring outdoor kitchen design options before committing to a layout will save significant rework later.
Framing material shapes durability and what finishes you can use
The frame is the structural core of the island, and the material you choose affects both long-term durability and what surface finishes are practical. Three options are common: wood, steel studs, and concrete block.
Wood is the least suitable for outdoor use. Galvanized steel studs (typically 16-gauge or 18-gauge C-channel) resist rot, insects, and combustion, making them a sound choice around grilling areas. They pair best with lightweight stone veneer or tile as a finish. Concrete block is widely considered the most durable framing option: it will not corrode, rust, or warp, and it can carry the weight of heavy natural stone or thick veneer without issue. The trade-off is that concrete block requires a poured concrete slab or footing for support and cannot be placed on a wooden deck. Your site conditions, particularly whether you have an existing slab and what finish material you prefer, will largely determine which framing path makes sense.
Utilities require licensed tradespeople and permits at every turn
Gas, electrical, and plumbing connections are not optional add-ons. They are structural decisions that have to be planned before framing is complete, because the rough-in work runs through or beneath the structure.
Gas lines must be sized, run, and pressure-tested by a licensed plumber or gas fitter. A gas permit is required in virtually every jurisdiction, and the system must be inspected before use. An accessible shut-off valve is standard. For homes without natural gas service, propane is the alternative and requires periodic tank refills. On the electrical side, a dedicated circuit with GFCI-protected, wet-rated outlets is required for most larger kitchens. Any new wiring, circuits, or outlet installation triggers an electrical permit in most jurisdictions. Plumbing for a sink follows the same pattern: a licensed plumber, a permit, and an inspection. Running these trades in sequence, with inspections completed before the next stage closes in, is what keeps the project on track. Landscape lighting for the kitchen area follows similar permitting logic and is worth coordinating at the same stage.
Countertop and appliance choices have to be outdoor-rated
Not every material or appliance that works indoors performs outdoors. Countertops need to handle freeze-thaw cycles, UV exposure, moisture, and grease. Granite, porcelain tile, and poured concrete are the most commonly specified options for outdoor kitchens in climates like Wisconsin's. Each has different maintenance demands and aesthetic character, so the choice is both practical and visual.
Appliances must be rated for outdoor use. Manufacturer clearance requirements, particularly around grills and burners, are not suggestions: they are safety specifications that also affect how the island is dimensioned during framing. Selecting appliances before finalizing the frame layout means the structure is built to the right dimensions from the start rather than adjusted after the fact. If you are weighing material options, a closer look at stainless steel for outdoor kitchens covers what holds up and what to watch for in that category specifically.
Budget categories to separate before you get a number
Treating an outdoor kitchen as a single line-item budget figure leads to surprises. The actual cost is built from distinct categories: the foundation or patio base, the structural frame and island build-out, utility connections (gas, electrical, and plumbing each carry their own labor and permit costs), appliances, countertop material, and finish cladding. Each of these can vary independently depending on size, material choices, and site conditions.
Separating these categories early makes it easier to compare bids, identify where scope adjustments have the most impact, and phase work if needed. A homeowner on a sloped site, for example, may need a retaining wall or graded base before the kitchen foundation can even be set, which adds a category that a flat-site project does not have. Understanding what drives retaining wall project costs can help if your site requires that kind of groundwork first.
The frame, the utilities, and the finish materials are three separate decisions that have to be compatible with each other before a single block is laid.
How the build unfolds, stage by stage
- 1
Choose location and confirm the layout
Location determines utility routing, traffic flow, and how the kitchen connects to the rest of the outdoor space. Before anything is built, the layout needs to be confirmed: island dimensions, appliance placement, and clearances. Appliance clearance requirements from the manufacturer should be in hand at this stage, because they affect island sizing. If you are still developing ideas, browsing outdoor kitchen inspiration can help you identify the configuration that fits your space and how you actually cook.
- 2
Pull permits before work begins
Gas, electrical, and plumbing work each require permits in most jurisdictions, and those permits need to be in place before licensed tradespeople begin rough-in work. Skipping this step creates problems at resale and can require demolition of finished work for inspection access. Confirm permit requirements with your local municipality early; the list can include a building permit for the structure itself in addition to trade-specific permits.
- 3
Prepare the site and establish the base
A level, stable base is the foundation everything else depends on. For concrete block framing, this means a poured concrete slab or footing. For steel stud framing, a paver base or existing concrete slab may be sufficient depending on conditions. Ground preparation, grading, and drainage need to be addressed at this stage, not after the structure is in place. On sloped or complex sites, this phase can involve significant earthwork.
- 4
Run utility rough-ins through the structure
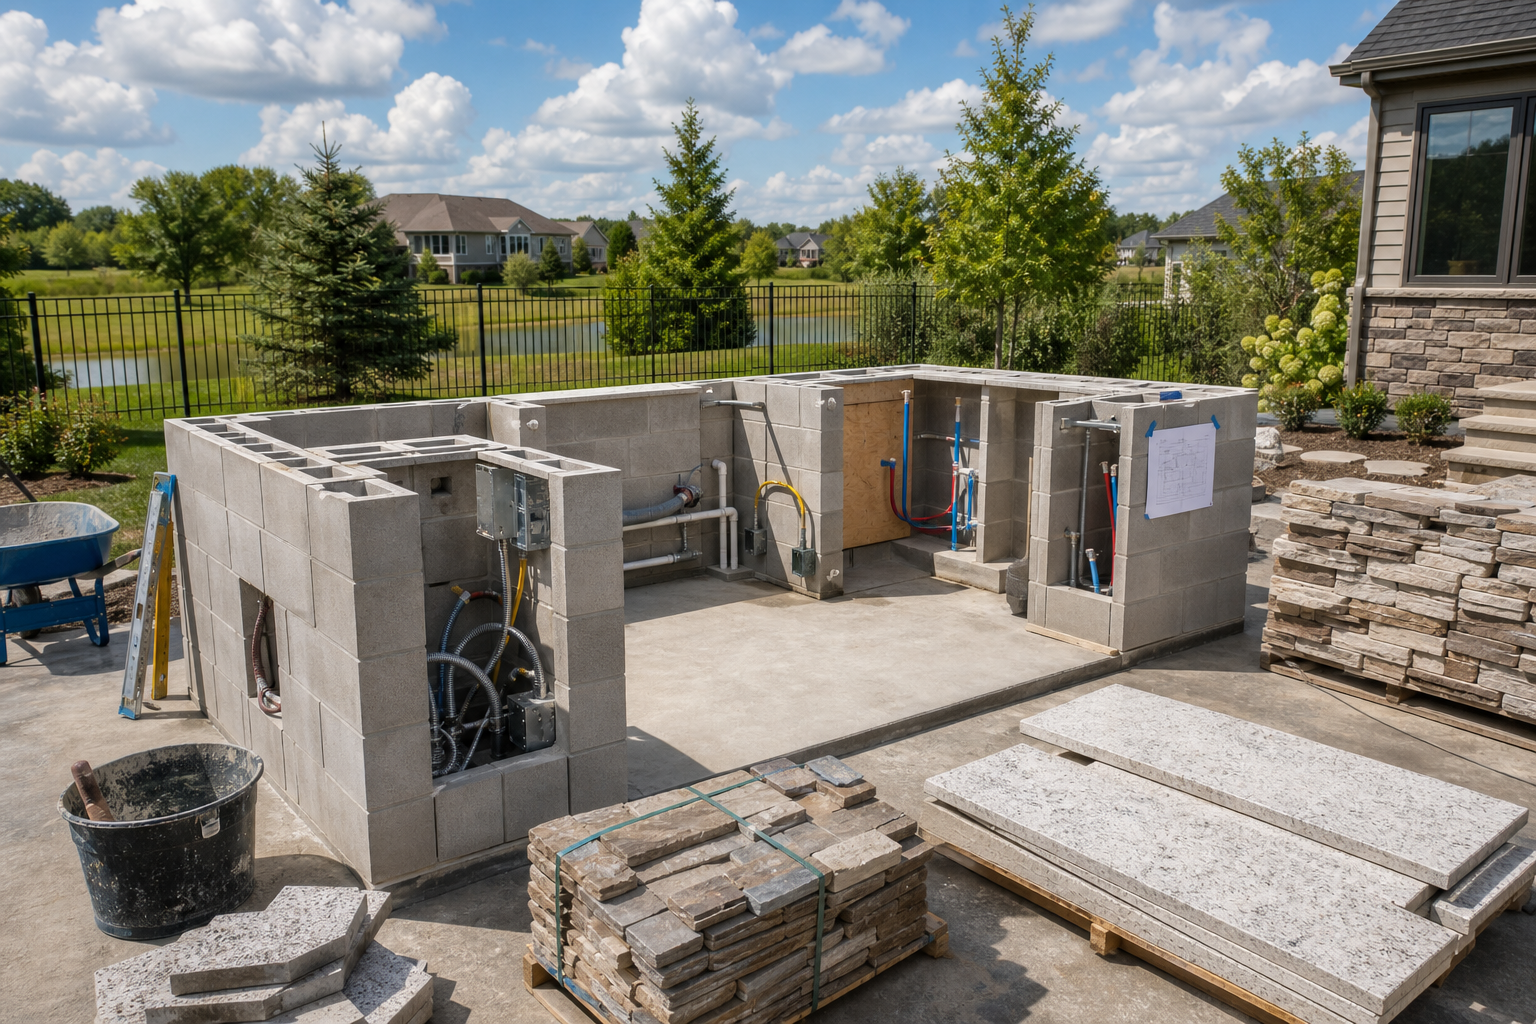
Gas lines, electrical conduit, and plumbing supply and drain lines all need to be roughed in before the island is framed and closed in. This is the stage where licensed tradespeople work: a gas fitter for the gas line and shut-off valve, a licensed electrician for the dedicated circuit and GFCI outlets, and a plumber if a sink is included. Inspections happen at the rough-in stage, before anything is enclosed, so scheduling trades in the right sequence matters.
- 5
Frame the island and apply exterior finish
With utilities roughed in and inspected, the structural frame goes up. Steel stud framing is assembled with galvanized C-channel studs and sheathed in cement board before tile or lightweight veneer is applied. Concrete block is laid course by course on the slab footing and can carry heavier stone finishes. The finish material is applied to the exterior of the frame, so the framing choice and finish choice need to be compatible from the start. This is also when any cabinetry or door inserts are set.
- 6
Set countertops, install appliances, and inspect
Countertops are templated and installed after the frame is complete. Granite, porcelain tile, and concrete each require different installation methods and sealers appropriate to outdoor exposure. Appliances are dropped in or mounted to manufacturer specifications, connected to the roughed-in utilities, and tested. A final inspection by the relevant trade inspectors closes out the permits and confirms the system is safe to use. The finished patio and outdoor living space around the kitchen is typically completed in coordination with this final stage.
Benefits
Permits prevent costly surprises
Gas, electrical, and plumbing work each require permits and inspections in most jurisdictions. Completing this process correctly from the start avoids the need to open finished work for retroactive inspection and protects the homeowner at resale.
Framing choice drives long-term performance
Steel studs and concrete block both outperform wood in outdoor conditions, but they suit different sites and finishes. Choosing the right framing material for your base and finish plan is one of the most consequential decisions in the entire build.
Sequencing trades correctly keeps the project on track
Utility rough-ins must be inspected before framing closes in around them. Getting the trade sequence right is what separates a project that moves efficiently from one that stalls waiting for inspections or requires rework.
Outdoor-rated materials handle Wisconsin winters
Countertops and appliances that perform indoors do not automatically perform outdoors, especially through freeze-thaw cycles. Specifying materials rated for outdoor use and cold climates at the design stage prevents premature failure.
Separating budget categories clarifies real scope
Foundation, framing, utilities, appliances, and finishes each carry independent costs. Treating them as distinct line items makes it easier to compare bids accurately and identify where scope adjustments have the most impact.
What this looks like in real projects
New patio and outdoor kitchen built together
A homeowner planning a backyard renovation decides to build the patio and outdoor kitchen at the same time rather than add the kitchen later. This approach lets the patio base, utility routing, and island placement be coordinated from the start, avoiding the need to cut into finished hardscape to run gas or electrical. Building both elements as a single coordinated system typically results in cleaner utility routing and a more cohesive finished space. The patio and hardscape work is sequenced so the base is set before the island frame goes up.
Sloped backyard requiring grading before construction
On a yard with significant grade change, the site preparation phase is more involved than on a flat lot. The area where the kitchen will sit needs to be cut and leveled, which may require a retaining wall to hold the grade on one or more sides. The retaining wall and kitchen foundation are designed together, because the wall's footing and the kitchen slab need to be structurally compatible. Skipping this coordination and treating the wall as a separate later project can result in drainage problems and settlement. See how retaining walls handle sloped and complex yards for more on what that groundwork involves.
Adding a kitchen to an existing patio
A homeowner with an existing concrete patio wants to add a built outdoor kitchen without replacing the slab. The existing slab is evaluated for thickness and condition before framing begins, since concrete block requires a structurally sound footing and steel stud framing has different base requirements. Utility routing becomes the main planning challenge: gas and electrical lines need to reach the island location, which may mean trenching through or around the existing patio surface. Getting a licensed gas fitter and electrician involved in the planning phase, before any work begins, prevents layout decisions that make utility runs impractical.
Outdoor kitchen as part of a lakefront outdoor living space
On a lakefront property, an outdoor kitchen is often one element of a larger outdoor living design that includes a patio, fire feature, lighting, and lake views. In this context, the kitchen's placement relative to sightlines, prevailing wind, and the path from the house to the water matters as much as the kitchen's internal layout. Utility routing on lakefront lots can be more complex due to site access, shoreland setback requirements, and the distance from the home's utility connections. Coordinating all elements as a single design, rather than adding the kitchen as an afterthought, produces a space that functions as a whole.
Building an outdoor kitchen: questions worth asking first
Ready to move from planning to building your outdoor kitchen
Building an outdoor kitchen well means coordinating site prep, utilities, structure, and finishes as a single project, not a series of add-ons. McGuire Landscape Company designs and builds outdoor kitchens as part of complete outdoor living spaces across Washington, Waukesha, and Ozaukee Counties. Reach out to talk through your site, your goals, and what the build will actually involve.
Start the conversation