

How to Design Landscape Lighting for Your Outdoor Space
Landscape lighting designed right transforms how you use your yard after dark
A practical guide to planning light placement, fixture types, and control systems for any outdoor space.
Plan your outdoor lighting with a local specialist
Talk through your outdoor lighting plan with a designer who knows what works in Wisconsin yards.
Start with what the space needs to do at night
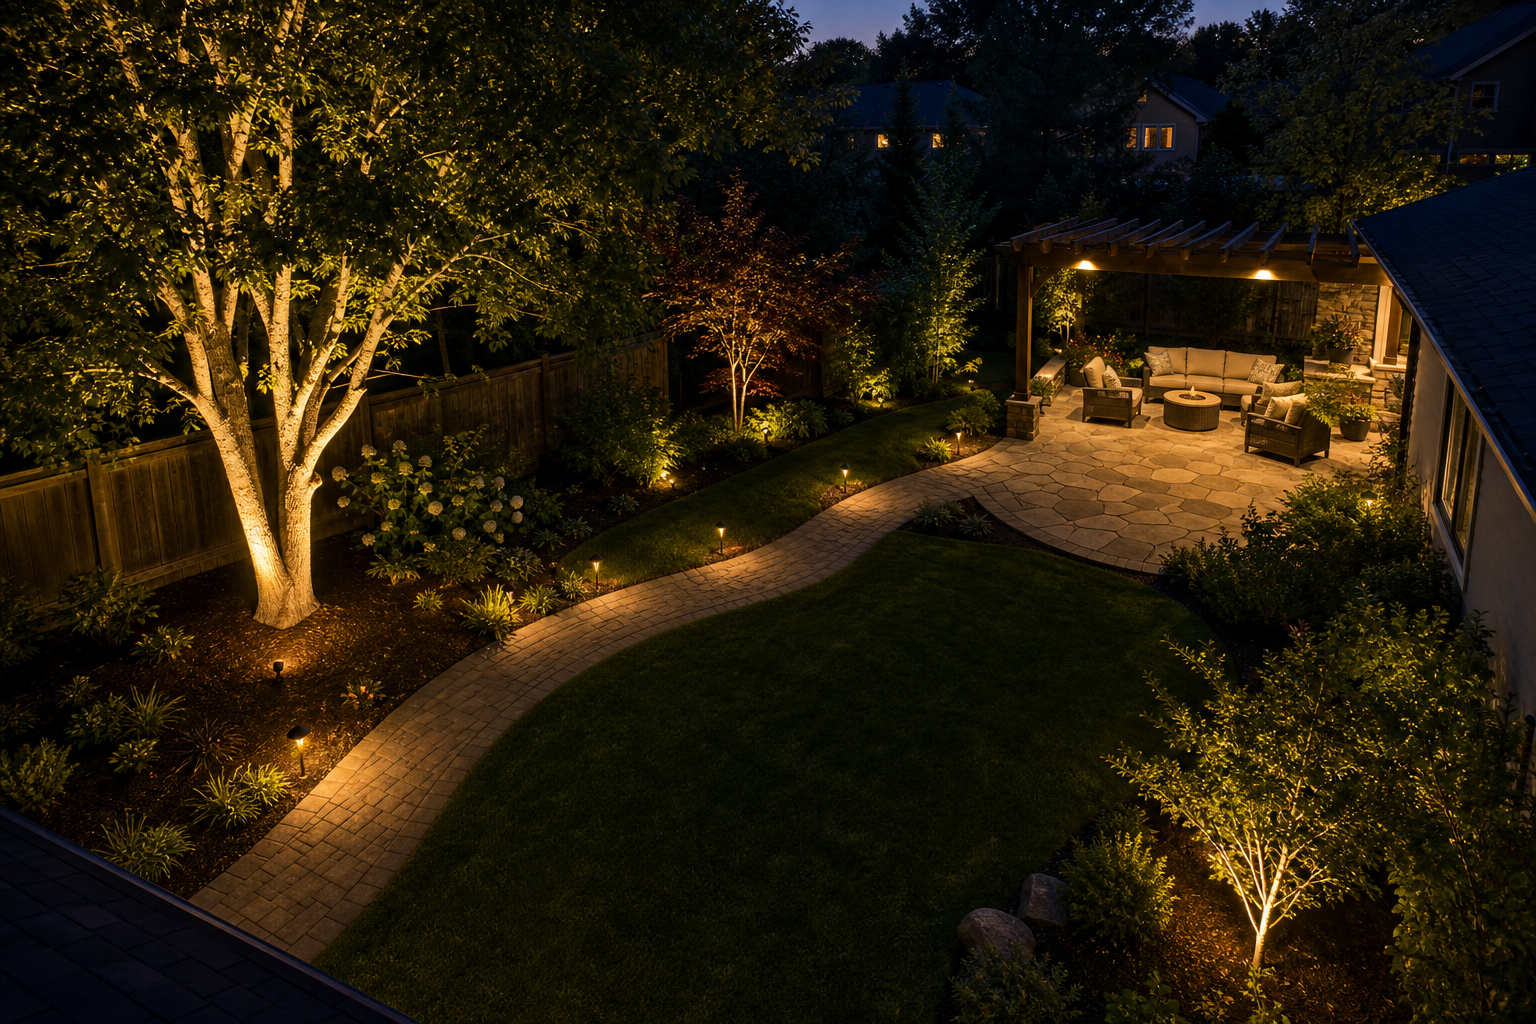
Before choosing a single fixture, walk your property after dark and note where you feel unsafe, where you can't see clearly, and where the yard disappears entirely. Those observations are the foundation of a good lighting plan. Most outdoor spaces have three distinct needs: ambient light for broad areas like patios or lawns, task light for functional spots like steps, walkways, and outdoor cooking areas, and accent light to highlight specimen trees, water features, or architectural details. Treating all three as separate layers, rather than trying to satisfy them with one type of fixture, is what separates a designed system from a collection of lights pointed at random. A well-planned backyard patio benefits enormously from this layered approach, especially once the sun goes down.
Choosing between low-voltage and line-voltage systems
The most consequential early decision is your system voltage. Low-voltage systems run at 12 volts through a transformer plugged into a standard outlet, and they suit the vast majority of residential yards. They are DIY-friendly because the lower voltage eliminates the need for deep cable burial or conduit, and LED fixtures used in these systems consume at least 75% less energy than incandescent alternatives. The main technical challenge with 12V systems is voltage drop on long cable runs: fixtures at the far end of a long run can receive insufficient power, causing dimming. Line-voltage systems run at 120 volts, produce more raw output, but require a licensed electrician and typically a permit. For most suburban and lakefront residential projects, low-voltage LED is the practical choice. If you're planning an outdoor kitchen with dedicated task lighting over a cooking surface, that zone may warrant a line-voltage circuit handled by an electrician.
Placement techniques that shape what people actually see
Uplighting, downlighting, and path lighting each work differently, and knowing when to use each one matters. Uplighting places a fixture at the base of a tree or architectural feature and aims it upward. For tall, narrow trees, a narrow beam angle (roughly 10 to 25 degrees) concentrates the light effectively; for spreading shade trees, a wider beam (36 to 60 degrees) fills the canopy. Using two fixtures at slightly different angles on either side of a tree creates a more naturalistic result than a single centered beam. Moonlighting is a downlighting technique where a fixture is mounted high in a tree and aimed downward, casting branch shadows on the ground below and simulating the quality of natural moonlight. Path lights are typically 12 to 24 inches tall and work best spaced 6 to 8 feet apart in a staggered pattern on alternating sides of the walkway, creating rhythm without a runway effect.
Contrast and glare control are what make a design look professional
One of the most common mistakes in residential lighting is trying to illuminate every part of the yard equally. Intentional dark areas are a design tool, not a gap in coverage. The contrast between lit focal points and receding shadows is what gives a nighttime landscape depth and visual interest, letting the eye move naturally from one element to the next. Glare is the other problem that undermines otherwise good plans. Fixtures aimed directly at viewers, or placed too close to seating areas without shielding, create discomfort rather than atmosphere. Use shielded fixtures aimed at surfaces rather than at people, and choose beam angles appropriate to the distance and spread you need. If you are also planning fire features in the space, account for the light those produce when positioning nearby fixtures, since the two sources interact.
Controls, power planning, and how plants change things over time
A lighting system with no control strategy becomes either always on or always off. Zoning your system so that different areas, entry path, patio, garden beds, can be switched or dimmed independently gives you flexibility across seasons and occasions. Timers are the baseline; smart controllers that integrate with a phone app or home automation system add scheduling and remote adjustment without extra wiring in most low-voltage setups. Equally important is planning for plant growth. A fixture that perfectly lights a young ornamental tree this year may be blocked or overpowered by that same tree in three years. Position fixtures with mature plant sizes in mind, or plan on adjusting them as the landscape develops. For properties with retaining walls or grade changes, factor in where power sources are located relative to the walls themselves, since running cable across or through a wall after construction is significantly harder than planning for it beforehand. You can also explore how professional installation compares to off-the-shelf systems before committing to an approach.
The contrast between lit focal points and intentional shadow is what gives a nighttime landscape depth, not more fixtures aimed at more surfaces.
How to design landscape lighting step by step
- 1
Walk the property after dark
Before drawing anything, observe the space at night without any added light. Note which entry points feel unsafe, which steps are hard to see, and which trees or features you wish were visible. This walk produces a functional priority list that keeps the design grounded in how the space is actually used rather than how it looks in a catalog.
- 2
Map your lighting zones on paper
Sketch a rough overhead plan of the property and mark three categories: areas needing functional task light (steps, paths, cooking zones), areas suited to accent or uplighting (specimen trees, walls, water features), and broad ambient zones (patio, lawn edges). Grouping fixtures into independently controlled zones at this stage makes the wiring plan far simpler and gives you more flexibility later.
- 3
Choose your system voltage and transformer size
Decide between a 12-volt low-voltage system and a 120-volt line-voltage system based on your output needs and whether you want to handle installation yourself. For a low-voltage system, add up the wattage of all planned fixtures and size your transformer to handle that load with room to grow. Place the transformer near an outdoor GFCI outlet, ideally centrally located relative to the zones it will feed.
- 4
Select fixtures rated for outdoor conditions
Every fixture in a landscape application must carry a wet or damp location rating. Wet-rated fixtures can handle direct rain and ground-level moisture; damp-rated fixtures suit covered areas like soffits or pergola undersides. For Wisconsin properties that experience freeze-thaw cycles, look for fixtures with corrosion-resistant housings and sealed lens assemblies that won't crack under repeated temperature swings.
- 5
Plan cable runs to manage voltage drop
In a 12-volt system, long cable runs cause voltage drop that dims fixtures at the far end of the circuit. Run separate cable home-runs from the transformer to each zone rather than daisy-chaining all fixtures on one long wire. Heavier gauge wire (10 or 12 AWG) on longer runs compensates for resistance. Mark the planned cable paths on your sketch before digging so you avoid conflicts with irrigation lines, tree roots, or hardscape edges.
- 6
Set controls and plan for plant growth
Install a timer or smart controller at the transformer so the system runs on a predictable schedule without manual switching. Set zones independently so the patio can stay lit while garden accent lights turn off earlier. Revisit fixture positions every two to three seasons as plants mature, since a fixture that perfectly illuminates a young shrub this year may be buried inside its canopy within a few growing seasons. Adjustability is easier to build in at the start than to retrofit later.
Benefits
Safety at grade changes and entries
Well-placed task lighting at steps, paths, and entry points reduces trip hazards and makes a property navigable after dark. Illuminating grade transitions specifically matters most on sloped sites and lakefront properties where the path to the water involves multiple level changes.
Extended usability of outdoor spaces
A patio or outdoor kitchen that goes dark at sunset effectively loses hours of use. Ambient and task lighting designed for the space allows cooking, dining, and conversation to continue well into the evening without relying on a single overhead floodlight.
Energy efficiency with LED low-voltage systems
LED fixtures in a 12-volt low-voltage system use at least 75% less energy than incandescent alternatives, meaning a full landscape lighting system can run on a surprisingly modest electrical load. Lower operating costs and longer fixture life make LED the practical default for most residential applications.
Visual depth through contrast and layering
A designed lighting plan uses shadow as deliberately as light. Contrast between lit focal points and darker receding areas gives a nighttime landscape dimension and visual interest that uniform brightness cannot achieve.
Flexibility through independent zone control
Zoning a system so that paths, accent features, and entertaining areas can be controlled separately means the lighting can adapt to different uses and seasons. Smart controllers or timers add scheduling without requiring additional wiring in most low-voltage setups.
Lighting scenarios worth planning for specifically
Lakefront property with a pier and boathouse
A lakefront homeowner needs lighting that works across several distinct zones: the path from the house to the water, the pier deck itself, and any entertainment space around the boathouse. Path lighting along the grade change from lawn to shoreline is a safety priority, particularly on steep sites. Downlighting mounted under a boathouse roof overhang can illuminate the dock without shining across the water in ways that disturb neighbors or interfere with navigation. Because cable runs from the house to the water's edge can be long, voltage drop planning is critical on these sites.
Patio with an outdoor kitchen and fire feature
A homeowner who has built a patio with an outdoor kitchen and a fire feature needs lighting that handles both task and ambient needs without competing with the fire's own glow. Task lighting over the cooking surface requires enough output to work safely at night; a line-voltage circuit handled by an electrician is often the right call for that zone specifically. The surrounding seating area benefits from low-level ambient fixtures or downlighting from a pergola overhead, kept dim enough that the fire feature remains the visual anchor of the space.
Sloped backyard with retaining walls and grade changes
On a sloped property with retaining walls, lighting serves both aesthetic and safety purposes. Wall-mounted fixtures or recessed step lights built into the wall face illuminate grade transitions clearly. Uplighting placed at the base of a wall and aimed at the face highlights the texture of natural stone or concrete pavers and makes the wall a visual feature after dark. Cable routing must be planned before wall construction, since running conduit through a finished retaining wall is difficult and disruptive.
Suburban front yard focused on curb appeal
A homeowner wanting to improve nighttime curb appeal typically focuses on three elements: the entry path, the front facade, and one or two specimen trees or shrubs in the planting beds. Staggered path lights spaced 6 to 8 feet apart on alternating sides of the walk create a welcoming rhythm without over-illuminating. Uplighting on the house facade works best when fixtures are aimed at architectural features like columns or gable ends rather than washing the entire wall evenly. Keeping the overall light level moderate, with intentional dark areas in the lawn, makes the lit elements read more clearly.
Common questions about designing landscape lighting for your outdoor space
Landscape lighting works best when it is planned from the start
If your outdoor space includes grade changes, a lakefront, or a patio with a kitchen and fire feature, lighting design is worth planning alongside the hardscape rather than after it. McGuire Landscape Company designs landscape lighting as part of the broader outdoor living system for properties in Washington, Waukesha, and Ozaukee Counties. Reach out to talk through what your space needs.
Start your lighting plan