

Outdoor Kitchen Designs: Ideas and Inspiration for Your Backyard
Backyard kitchens designed to belong in your landscape, not just sit on it
Layout ideas, material guidance, and design principles for outdoor kitchens that hold up through Wisconsin seasons.
Start your outdoor kitchen design the right way
Schedule a site consultation and start designing an outdoor kitchen that fits your property, your grade, and your backyard vision.
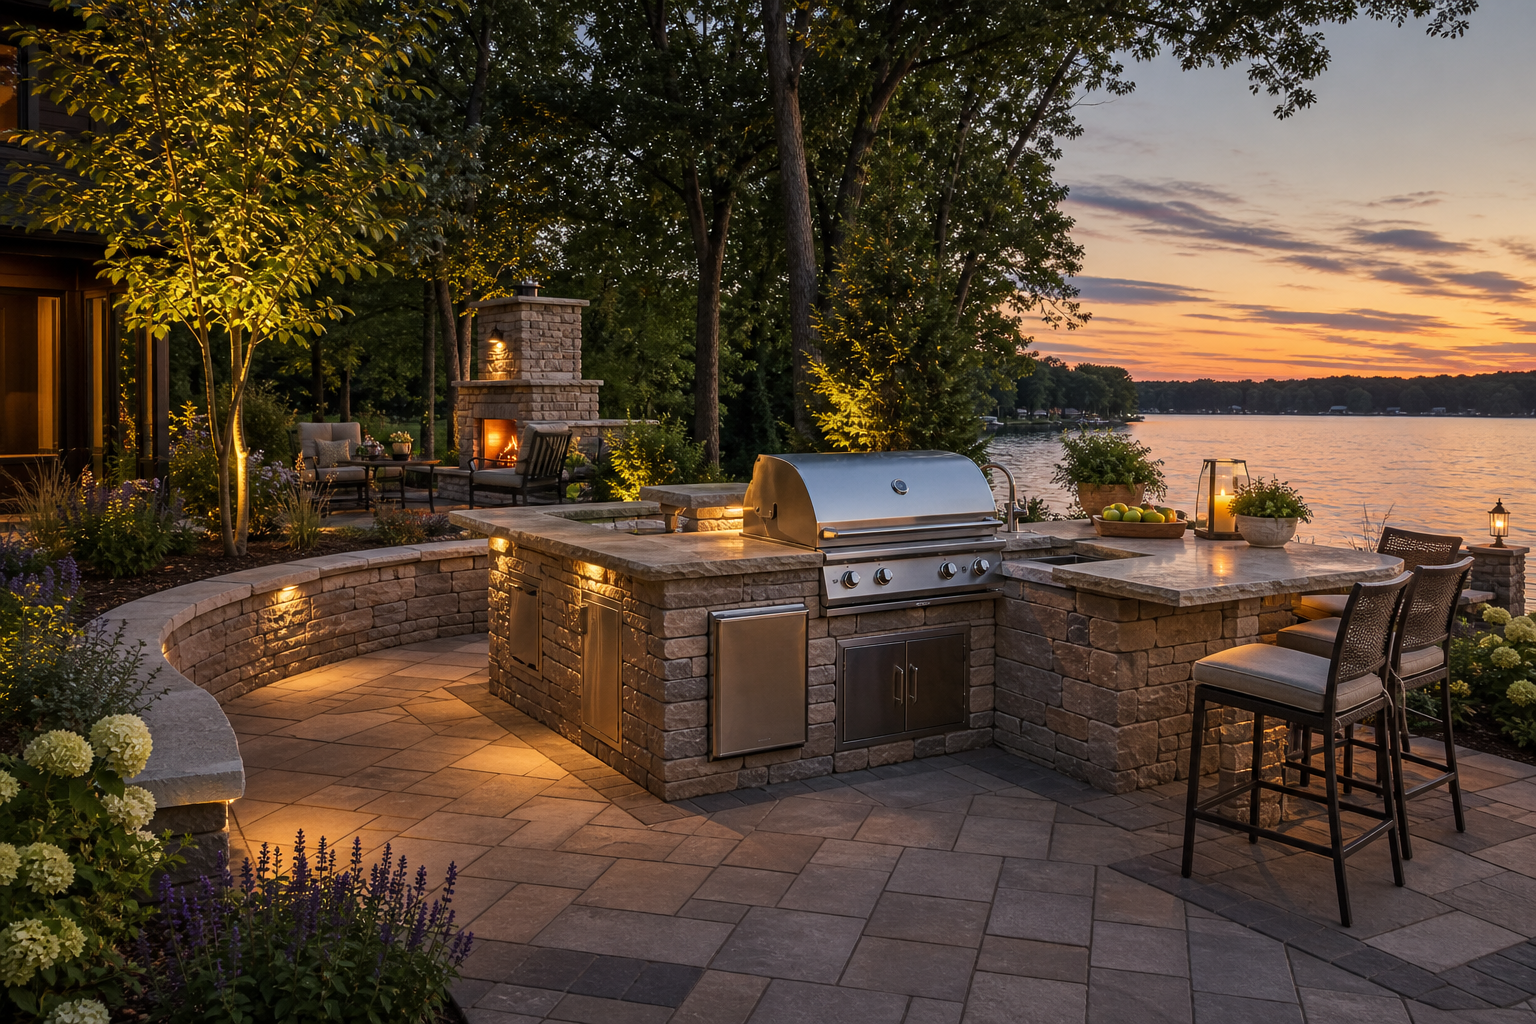
An outdoor kitchen works best when the landscape designs it
Most outdoor kitchens that feel awkward share the same origin story: the grill was placed first, the patio came next, and the kitchen structure arrived last as a bolt-on. Each piece was chosen in isolation, and the result looks like it. A kitchen that feels cohesive starts from a different premise: the cooking area, the patio surface, the retaining walls, the plantings, and the lighting are all resolved together before a single paver is set.
This matters especially on sites with grade change, drainage demands, or a view worth protecting. In southeastern Wisconsin, those conditions are common. A sloped backyard may need a retaining wall to create a level pad for the kitchen. A lakefront property may require setback coordination before any structure is positioned. Treating the outdoor kitchen as one component of a larger designed system is what separates a project that performs and ages well from one that creates maintenance problems within a few seasons.
Layout zones that make a kitchen actually functional
The most useful framework for outdoor kitchen layout is also the simplest: divide the space into a cooking zone, a prep zone, and a serving zone, and let traffic flow between them without crossing the grill. For larger spaces, refrigeration, storage, and a bar or drinks station extend this logic without complicating it.
The grill anchors the layout. Place it at the center and let everything else flow around it, keeping prep surfaces within arm's reach and serving space accessible from the seating side. An island or L-shaped configuration handles this well for most residential backyards. The L-shape in particular creates a natural separation between cooking and prep, provides corner storage, and begins to define an outdoor room rather than just a counter. A straight single-run layout is the right answer for narrow spaces or where the kitchen runs along a fence or exterior wall, keeping everything accessible from one side.
Traffic flow matters as much as appliance placement. Guests should be able to move from seating to the serving area without walking behind the cook or through the heat zone. Getting this right on paper, before construction begins, is far easier than correcting it after the slab is poured. For ideas on how a patio layout supports the kitchen's footprint, that planning stage is the right time to resolve both together.
Materials that survive Wisconsin freeze-thaw cycles
Material selection for an outdoor kitchen in the upper Midwest is not the same decision as it would be in a milder climate. Freeze-thaw cycling, UV exposure across long summers, and seasonal moisture all narrow the field considerably.
For countertops, granite remains the proven standard: it handles heat, resists UV fading, and is easy to clean. Porcelain slab has gained traction more recently for its near-zero water absorption and stain resistance, making it a strong option where a more contemporary aesthetic is the goal. Concrete and natural stone countertops perform well but must be sealed annually to prevent oil staining, and the counter should be sloped slightly forward so rainwater drains rather than pools. Avoid quartz, limestone, and fragile tile in an exterior application.
For cabinets, aluminum and stainless steel are the appropriate choices. Aluminum is lightweight, corrosion-resistant, and holds up to rain, heat, and UV without rusting. Powder-coat finishes add a further layer of protection. For properties near the water, marine-grade 316 stainless steel offers greater corrosion resistance than standard 304 stainless.
The patio surface beneath and around the kitchen deserves equal attention. Concrete pavers and natural stone both perform well when installed over a properly prepared base, but the base preparation is what actually determines longevity through Wisconsin winters. See how pavers compare to poured concrete for the full picture on that decision.
Lighting and planting complete the outdoor room
A kitchen that is only usable in daylight is a kitchen that gets used less. Landscape lighting extends the functional hours of the space and, done well, makes the outdoor kitchen feel like a room rather than an appliance station. Task lighting over prep and cooking surfaces handles the practical side. Ambient lighting at the perimeter, whether in retaining walls, under counters, or in surrounding plantings, handles the atmosphere.
Plantings do structural work in an outdoor kitchen design. A privacy screen of evergreens or ornamental grasses on the windward side reduces heat loss from the cooking area and creates enclosure without walls. Low plantings along the kitchen perimeter soften the transition from hardscape to lawn. Raised planters integrated into the kitchen structure itself, often used for herbs, tie the cooking function directly to the garden.
All of these elements, the lighting runs, the irrigation for plantings, the drainage beneath the patio pad, need to be coordinated before construction begins. Running conduit after pavers are set, or adding drainage after a retaining wall is built, costs significantly more and often compromises the finished result. The outdoor living spaces approach McGuire takes treats all of these systems as one coordinated project from the start.
The kitchen, the patio, the walls, and the plantings are not separate additions; they are one system, and they only perform like one when they are designed that way from the beginning.
How a design-to-build outdoor kitchen project works
- 1
Evaluate the site and drainage conditions
Before any design decisions are made, the site itself gets read carefully: grade, drainage patterns, soil conditions, utility locations, and, on lakefront properties, shoreland setback requirements. Drainage is the factor most often overlooked and most often responsible for long-term problems. A kitchen pad that holds water will heave and crack through freeze-thaw cycles. Identifying drainage solutions at this stage, not after the slab is poured, is what makes the difference. This is also when access constraints are documented, since restricted access on sloped or lakefront sites affects what equipment can reach the build area and how materials are staged.
- 2
Develop the design concept and select materials
With site conditions understood, the layout is resolved: zone placement, traffic flow, appliance locations, and the relationship of the kitchen to the patio, seating area, and any adjacent features like a fire pit or retaining wall. Material selection happens in this phase, covering countertops, cabinet construction, patio surface, and lighting plan. Choosing materials that perform in Wisconsin's climate is not a secondary concern; it shapes the design from the beginning. Porcelain slab, granite, aluminum cabinets, and concrete pavers are evaluated against the specific site exposure, orientation, and aesthetic direction.
- 3
Coordinate permits and utility connections
Gas lines, electrical connections, and water supply all require coordination with licensed trades before construction begins. On lakefront properties, Wisconsin DNR shoreland permit requirements may apply depending on the structure's location relative to the ordinary high-water mark. Getting permit and utility coordination wrong at this stage can halt a project mid-construction or require costly changes to a design that was already built. Resolving all of this in advance, with full knowledge of local requirements across Washington, Waukesha, and Ozaukee Counties, is part of the planning process, not an afterthought.
- 4
Build the hardscape base and structure
Construction begins with the patio pad and any retaining walls or grading work needed to create a level, stable platform. The base preparation beneath pavers or stone is what determines how the surface performs over years of freeze-thaw cycling, so this phase is not abbreviated. The kitchen structure, including framing, cabinets, and countertops, goes in once the base is established and utility rough-ins are complete. Landscape lighting conduit and irrigation lines are run during this phase so they are fully integrated before the surface is finished. For more on how the patio surface itself is designed and built, see paver patio design ideas.
- 5
Install appliances, lighting, and plantings
The final phase brings the kitchen to life: appliances are set and connected, lighting fixtures are installed and programmed, and plantings are established around the perimeter. Privacy screening, herb planters, and ornamental grasses placed at this stage are selected to complement the hardscape materials already in place, not chosen separately. A final review of drainage performance, surface slope, and lighting coverage confirms that the project performs as designed before the site is handed over. The result is a space where every element, cooking surface, patio, walls, lighting, and plantings, was resolved as one system.
Benefits
Durability through Wisconsin seasons
Outdoor kitchens designed for the upper Midwest use materials and base construction methods selected specifically for freeze-thaw cycling. Granite countertops, aluminum or stainless cabinets, and a properly prepared paver base resist the seasonal movement that causes cheaper installations to crack, heave, and fail within a few years.
More usable outdoor living time
A kitchen with task lighting, a windbreak planting screen, and a covered or partially enclosed layout extends the season meaningfully in both directions. Thoughtful orientation and enclosure can add weeks of comfortable use at the beginning and end of the Wisconsin outdoor season.
Property value that reflects the investment
A well-designed outdoor kitchen, integrated into a cohesive hardscape and landscape, adds to the property in a way that a prefabricated unit sitting on a concrete pad does not. The design quality and material durability are what translate the investment into lasting property value.
Single-contractor coordination across all systems
When the kitchen, patio, retaining walls, lighting, drainage, and plantings are all designed and built by one contractor, there are no gaps between scopes and no finger-pointing when something does not perform. Every system is resolved together, which is the only way to guarantee they actually work together.
Outdoor kitchen designs across real site conditions
Lakefront kitchen connecting to a view deck
A lakefront homeowner wanted an outdoor kitchen positioned to take advantage of the water view while keeping the cooking area close to the interior kitchen. The site required DNR shoreland setback review before any structure could be positioned, and the grade between the house and the water meant the kitchen pad needed careful drainage planning to prevent runoff toward the shoreline. The kitchen was designed as part of a larger lakefront environment that included a view deck, landscape lighting, and privacy plantings on the windward side. Because the outdoor kitchen, deck, and shoreline access were all designed together, the finished space reads as a single connected environment rather than a series of separate additions.
Suburban backyard with grade change and terraced kitchen
A homeowner in a Washington County suburb had a backyard that sloped away from the house, making a conventional patio-and-kitchen layout impractical. The solution involved a tiered retaining wall system that created two level terraces: one for the outdoor kitchen and dining area, one for a lower lawn and fire feature zone. The retaining walls were designed to match the kitchen's material palette, using the same natural stone for the wall caps as for the countertop edging, so the grade change became a design feature rather than a problem to hide. Drainage was routed through the wall system and away from the foundation before a single paver was placed. For homeowners facing similar terrain, turning a sloped backyard into usable outdoor space starts with that same site evaluation step.
Phased outdoor kitchen built across two seasons
Not every homeowner is ready to build the full outdoor living space in a single project. One Waukesha County homeowner chose to build in phases: the patio pad, retaining wall, and kitchen structure in the first season, with the fire feature, landscape lighting, and privacy plantings added the following year. Phasing works when the design accounts for it from the start. Conduit for the lighting was run during the first phase so no pavers needed to be disturbed in year two. The gas line was stubbed for the future fire feature at the same time the kitchen gas connection was made. Planning both phases together before breaking ground is what made the second phase a straightforward installation rather than a retrofit.
Outdoor kitchen designs: questions homeowners ask
Ready to design an outdoor kitchen that fits your property
A well-designed outdoor kitchen starts with understanding the site: the grade, the drainage, the views, and how the space connects to the rest of your backyard. McGuire Landscape Company works with homeowners across Washington, Waukesha, and Ozaukee Counties to design and build outdoor kitchens as part of a fully coordinated landscape, not as a standalone addition. Reach out to schedule a site consultation and begin the design process.
Schedule a site consultation