

Retaining Wall Design Ideas: Styles, Materials, and What Works on Sloped Sites
Slopes, styles, and materials: how retaining walls actually work
A practical guide to choosing the right design, material, and drainage approach for your sloped site.
Get expert advice on your retaining wall project
Talk to a retaining wall specialist about your site's specific grade and drainage needs.
What a retaining wall is actually doing
A retaining wall resists the lateral pressure of soil pushing outward and downward on a slope. Without it, that pressure causes erosion, slumping, and the gradual loss of usable yard. The wall converts an unstable grade into a series of level planes, which is why retaining walls and usable outdoor space so often go together on difficult sites.
The structural challenge is not just holding soil in place. It is managing what happens when water saturates that soil. Saturated soil is dramatically heavier than dry soil, and water that cannot escape builds hydrostatic pressure behind the wall face. That pressure is why drainage is not an afterthought in retaining wall design. It is part of the structure itself.
For homeowners on sloped lots in southeastern Wisconsin, where freeze-thaw cycles add another layer of ground movement each spring, getting both the structural and drainage details right from the start determines whether a wall lasts decades or begins to lean within a few years.
Material choices and what each one offers
The five materials most commonly used for residential retaining walls are natural stone, concrete block, poured concrete, timber, and brick. Each has a distinct combination of visual character, durability, and engineering suitability.
Natural stone (fieldstone, limestone, or granite) is among the most durable options available, with lifespans that can reach 40 to 100 years or more. It suits naturalistic landscapes and lakefront properties particularly well. Concrete block, especially interlocking modular systems, is versatile and stackable without mortar, making it adaptable to curved layouts and varying heights. Poured concrete offers exceptional strength and a lifespan in the range of 50 to 100 years, though it reads as more industrial in finish unless faced with stone or textured forms.
Timber has a warm, rustic character but carries a meaningful trade-off: pressure-treated timber typically lasts around 30 years, and it is generally limited to walls under four feet in height. Brick offers a traditional aesthetic with low maintenance, and it pairs well with formal garden designs. The right material depends on the site's grade, the wall's required height, and the visual language of the broader landscape.
Height, engineering, and when permits apply
Wall height is the single biggest factor in how complex a retaining wall project becomes. For most residential projects, walls fall in the two-to-four-foot range, which is manageable without heavy equipment and often avoids the most demanding permitting requirements.
Once a wall exceeds four feet in height, measured from the base of the footing to the top of the wall, most jurisdictions require a structural engineer's review and a building permit under International Building Code guidelines. This is not a bureaucratic formality. Taller walls carry substantially greater loads, and the footing, batter (the inward lean of the wall face), and drainage system all need to be sized accordingly.
A practical rule for batter: the wall face should slope inward at a minimum of 1 inch for every 1 foot of rise. This lean transfers load more efficiently into the ground and reduces the risk of the wall face tipping outward over time. On sites where the grade demands more than four feet of retained height, a tiered approach, two or more shorter walls with level terraces between them, often solves the engineering problem while also creating more usable outdoor space. See backyard and patio design considerations for how terraced walls connect to broader outdoor living planning.
Drainage: the detail that determines longevity
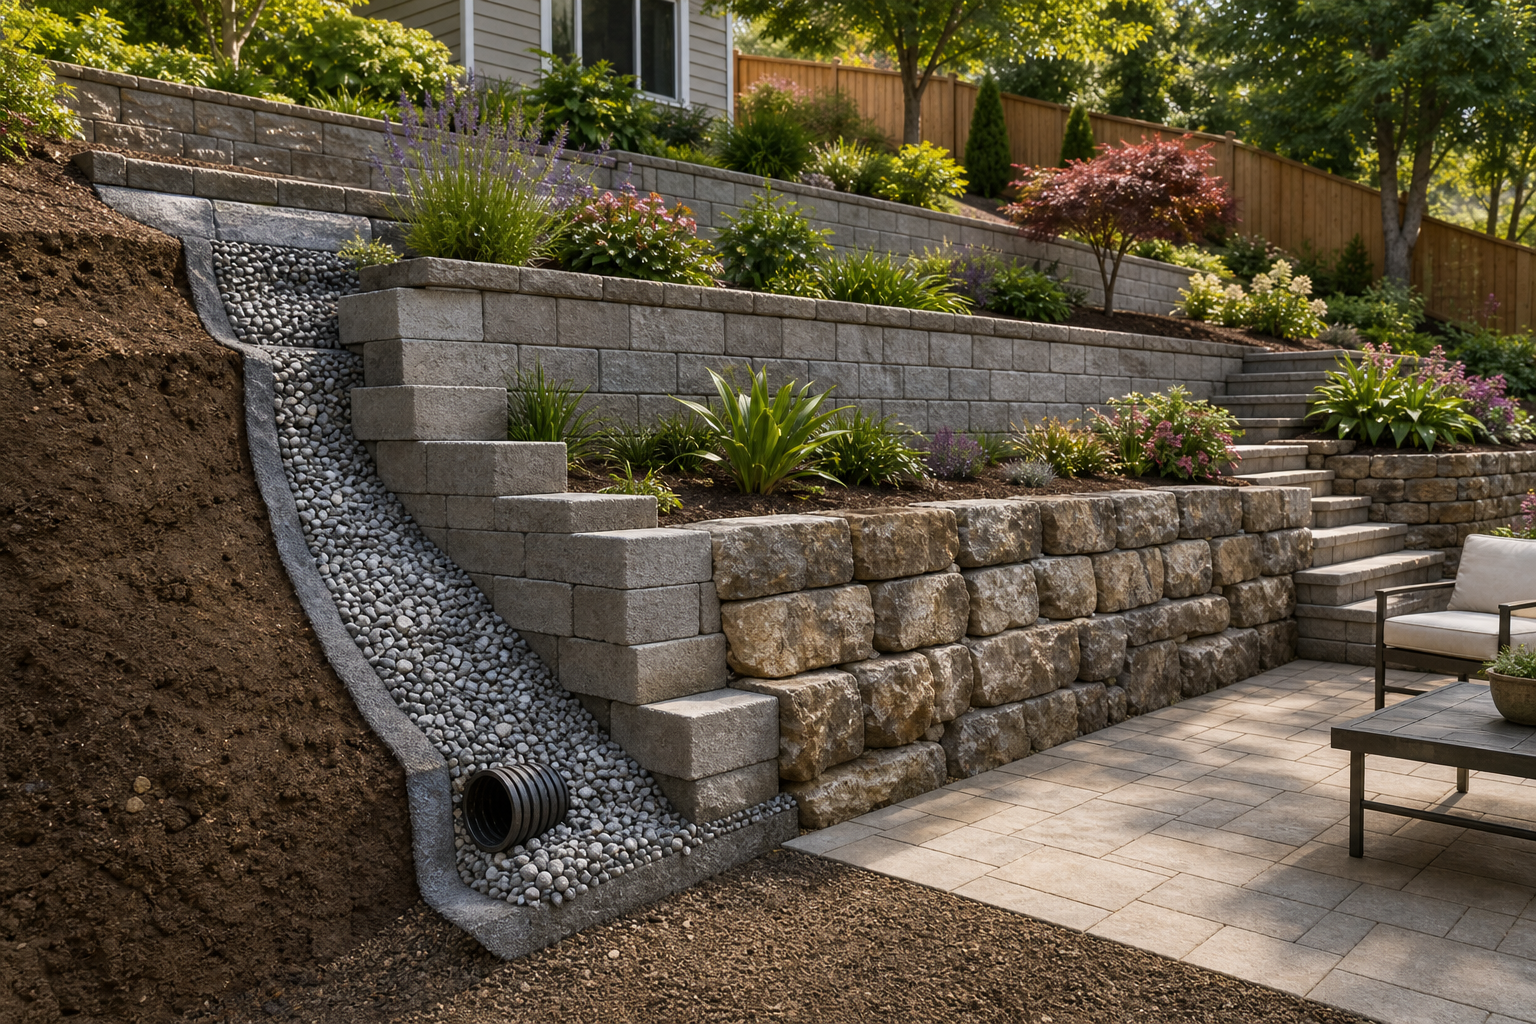
Gravel backfill and weep holes are the two primary tools for managing water behind a retaining wall. Gravel (typically crushed stone) placed directly behind the wall face allows groundwater to move downward rather than accumulate. Weep holes, small openings built into the wall at regular intervals near its base, give that water an exit path through the wall face.
Water trapped behind a wall doubles the load it must carry, adding the full hydrostatic pressure of saturated groundwater on top of the weight of the soil itself. In Wisconsin's climate, that water also freezes, expanding against the wall face with significant force each winter. A wall built without adequate drainage is not just at risk of leaning. It is at risk of failing entirely within a few seasons.
For stacked-block walls up to four feet tall, the foundation trench itself matters too. A trench filled with crushed rock helps prevent shifting and settling. A useful rule of thumb: dig the trench to a depth equal to one-eighth of the wall's planned height plus three additional inches. Getting this foundation detail right is as important as any choice made above grade. If erosion control is a broader concern on your property, drainage behind the wall is where the two problems overlap most directly.
Tiered walls and how they create usable space
On slopes of 30 to 35 percent grade or steeper, a single tall wall is rarely the best solution. A series of shorter tiered walls distributes the retained soil load across multiple structures, reduces the engineering complexity of each individual wall, and avoids the permitting threshold that kicks in above four feet.
The terraces between tiers are not just structural necessity. They become the most functional parts of the yard. A lower tier might hold a patio, a middle tier a planting bed, and an upper tier a lawn panel or seating area. Tiered retaining walls effectively convert a slope that was unusable into a sequence of level outdoor rooms. The visual result, walls stepping up the grade with planted beds or hardscape between them, is one of the most distinctive landscape features on sloped residential lots.
For homeowners planning an outdoor kitchen, fire feature, or gathering space alongside a retaining wall project, the terrace created by the wall is often the natural location for that hardscape. Explore fire pit patio ideas and backyard patio design ideas to see how these elements come together on graded sites.
Water trapped behind a retaining wall doubles the load it must carry, making drainage as important as the wall itself.
How to plan a retaining wall from grade to finish
- 1
Assess the slope and drainage conditions
Before choosing a material or style, measure the grade and identify where water flows across the site during and after rain. A slope of 30 to 35 percent or steeper signals that a tiered approach will likely serve better than a single wall. Note any existing drainage problems, such as pooling near the base of the slope or erosion channels, because these will need to be addressed as part of the wall design, not after it.
- 2
Determine wall height and permit requirements
Calculate how much height you need to retain based on the grade change. Walls up to four feet tall are generally within the range of residential construction without structural engineering review, though local requirements vary. Walls exceeding four feet typically require a permit and engineer's approval under standard building codes. If your grade demands more than four feet of retention, plan for tiered walls rather than a single tall structure.
- 3
Choose a material suited to the site and style
Match the material to the wall's required height, the visual character of the property, and the durability you need. Natural stone and poured concrete offer the longest lifespans, in the range of 50 to 100 years or more. Concrete block is adaptable and works well for curved or modular layouts. Timber suits lower walls and naturalistic settings but has a shorter service life than masonry options. See retaining wall pricing factors for how material choice affects overall project scope.
- 4
Plan the foundation and batter
For stacked-block walls, dig a trench filled with crushed rock to prevent settling. A reliable rule: trench depth equals one-eighth of the wall's planned height plus three inches. Build the wall face with a backward lean (batter) of at least 1 inch per foot of rise to transfer load efficiently into the ground and resist the outward pressure of retained soil over time.
- 5
Build in drainage from the start
Place crushed gravel directly behind the wall face as backfill, and incorporate weep holes near the base of the wall to give accumulated groundwater an exit path. Drainage is not optional on any retaining wall: water that cannot escape builds hydrostatic pressure that can double the effective load on the structure. In Wisconsin's freeze-thaw climate, trapped moisture also expands against the wall each winter, accelerating deterioration.
- 6
Integrate the wall with the broader landscape
A retaining wall that is structurally sound but visually isolated from the rest of the yard is a missed opportunity. Plan planting beds, landscape stairs, patio surfaces, or seating areas in relation to the wall from the beginning. Tiered walls in particular work best when the terraces between them are designed as usable spaces, not just soil shelves. Coordinate the wall's material and finish with any adjacent hardscape to create a coherent outdoor environment.
Benefits
Converts slopes into usable space
A well-designed retaining wall system transforms a grade that cannot be used into level terraces suitable for patios, planting beds, or lawn panels. Tiered walls in particular create outdoor rooms from terrain that would otherwise be wasted.
Manages water before it causes damage
Gravel backfill and weep holes built into the wall from the start prevent hydrostatic pressure from building behind the face. Drainage integrated into the structure protects the wall and the surrounding landscape from water-related failure.
Material choice drives long-term durability
Natural stone and poured concrete can last 50 to 100 years or more. Choosing a material matched to the wall's height and site conditions avoids premature replacement and the disruption that comes with it.
Tiered designs reduce engineering complexity
On steep grades, two or more shorter walls are often structurally simpler than a single tall wall, and they can stay below the four-foot threshold that triggers permit and engineering requirements. Distributing retained height across multiple tiers is both a practical and a visual advantage.
Freeze-thaw performance depends on design details
In Wisconsin's climate, water trapped behind a wall freezes and expands each winter, accelerating deterioration. Walls built with proper batter, drainage, and footing depth are far more resistant to the seasonal ground movement that damages poorly planned structures.
Retaining wall scenarios on real residential sites
Steep backyard slope with no usable yard
A homeowner with a backyard that drops sharply from the house to the property line has essentially no flat space for outdoor living. A tiered retaining wall system, two or three shorter walls stepping down the grade, converts that slope into a sequence of level terraces. The upper terrace becomes a patio, the lower ones become planting beds or lawn panels. The wall does structural work and spatial work simultaneously, and the result is a yard that functions rather than just exists. This is one of the most common applications for retaining walls in southeastern Wisconsin's varied terrain.
Natural stone wall on a lakefront property
On a lakefront lot where the grade drops toward the water and the visual character of the property matters as much as the structure, natural stone is often the material that fits best. Fieldstone or limestone walls read as part of the landscape rather than imposed on it, and their durability, up to 100 years or more, suits the long-term investment a lakefront property represents. On regulated shorelines, wall placement must account for setback requirements, which is where coordinated planning between the wall design and any shoreline work becomes essential.
Concrete block wall creating a patio terrace
A homeowner wanting to add an outdoor kitchen or fire feature to a sloped backyard often finds that the retaining wall and the patio are the same project. A concrete block wall built to retain two to three feet of grade creates a level terrace large enough for a hardscape gathering space. Interlocking block systems allow for curved layouts that can wrap around a fire feature or define the edge of an outdoor kitchen area. Explore fire pit paver ideas for how the hardscape elements connect once the grade is resolved.
Drainage-first wall on a water-prone slope
Some sloped sites have a drainage problem before they have a retaining wall problem. Water channeling down a grade erodes soil, undermines foundations, and pools at the base of the slope. A retaining wall with properly designed gravel backfill and weep holes addresses both issues at once: it holds the slope and manages the water that was causing the erosion. Getting the drainage layer right is the most important technical decision on a water-prone site, and it needs to be planned into the wall's design from the start, not added after the fact.
Common questions about retaining wall design ideas
Ready to turn your slope into structured outdoor space
Retaining walls on sloped or difficult sites require careful planning before the first block is placed. If your property has a grade challenge, drainage concern, or a slope you want to convert into usable outdoor space, a conversation about the site's specific conditions is the right starting point. Reach out to discuss what your site needs and how a well-designed wall can solve it.
Start the conversation