

Retaining Wall Prices: A Realistic Guide for Homeowners
Retaining wall prices explained: what actually drives your quote
Material, height, drainage, and site conditions all shape the number. Here is how to think through each one before you build.
Understand your retaining wall project before you build
Get a clear picture of your project's cost drivers before your first contractor conversation.
Material choice is the first fork in the road
The material you choose sets the baseline for everything else: installed cost, expected lifespan, and how much labor the wall demands. Concrete block systems (sometimes called segmental retaining walls) are the most popular choice for good reason. They are engineered for interlocking strength, they handle freeze-thaw cycles well, and interlocking block systems can last 50 to 100 years with proper installation. Natural stone sits at the premium end of the material spectrum, requiring more hand labor to fit and set, but it can outlast virtually every other option. Timber is the entry-level choice by installed cost, but it is also the shortest-lived: pressure-treated timber typically needs replacement within 10 to 15 years, meaning you pay for labor twice. Poured concrete offers structural rigidity for taller or heavily loaded walls but involves forming and reinforcement costs that push the price higher. For a deeper look at how these trade-offs play out on a real project, see what drives the cost of your retaining wall project.
Wall height changes the engineering, not just the material
Height is not a linear cost multiplier. A wall that clears a certain threshold, commonly four feet measured from the bottom of the footing to the top of the wall, typically triggers permit requirements, engineering review, and inspections in most municipalities. That adds meaningful expense beyond the wall itself. Engineering is also commonly required at any height when the wall supports a surcharge: a driveway, a parking area, a building, or an upward slope behind the wall all place additional lateral pressure on the structure. Taller walls also require deeper footings and more robust drainage, both of which add to the excavation scope. Think of height not as a single variable but as a threshold that unlocks a different tier of project complexity.
Drainage is the cost item most homeowners underestimate
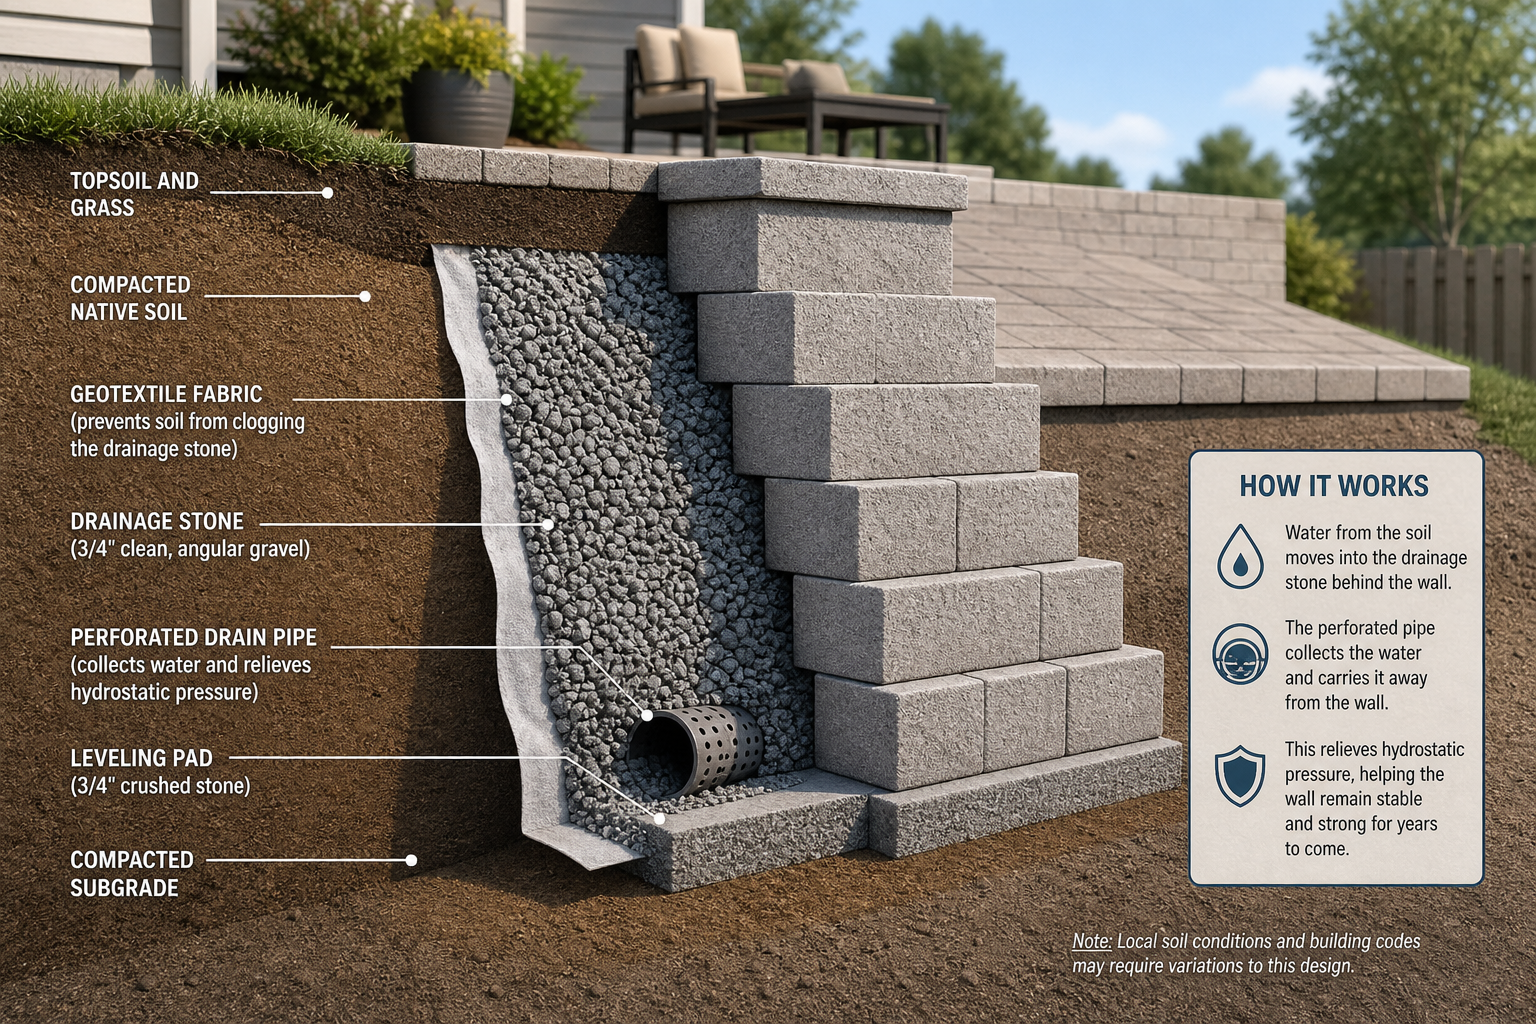
A retaining wall that holds back soil without managing water pressure behind it is a wall that will eventually fail. Hydrostatic pressure from saturated soil is one of the leading causes of retaining wall movement and collapse. Proper drainage typically means gravel backfill, a perforated drain pipe at the base, and weep holes or outlets that let water escape. On sites with heavy clay soil, high water tables, or significant upslope runoff, the drainage system can be nearly as involved as the wall itself. Waterproofing the back face of the wall is an additional line item on taller or more exposed installations. None of this is optional on a well-built wall; it is part of the structural system. If your yard already has drainage challenges, a retaining wall project is an opportunity to address them as a coordinated system rather than patching problems later. Drainage solutions are a natural companion to any slope stabilization project.
Site conditions determine how much work happens before the wall goes up
Excavation and backfill are line items that vary enormously by site. Rocky soil, tight access, steep grades, and the need to haul material in or out all affect how long the prep phase takes and what equipment can reach the site. On a flat suburban lot with easy truck access, excavation is straightforward. On a lakefront property or a steeply terraced backyard, it may require specialized equipment or hand work, both of which cost more. Soil type matters too: expansive clay holds water and exerts more lateral pressure on a wall than sandy or well-draining soil, which can require a heavier wall section or more robust drainage. If your site has any of these complicating factors, expect the total project cost to sit toward the higher end of any range you research. For sloped sites in particular, a wall is rarely a standalone element. It often connects to stairs, a patio, or a broader backyard renovation that needs to be planned as a single system.
Permits and inspections add time and budget, not just paperwork
Permit requirements for retaining walls vary by municipality, but walls over four feet tall require engineering approval, permits, and inspections in most jurisdictions. Some localities set the threshold lower: certain municipalities require a permit for any wall two feet or taller. Engineering fees, permit application costs, and the time required for inspection scheduling are real budget items that are easy to overlook when comparing initial quotes. They also affect your project timeline. A wall that needs engineered drawings and a permit review can add weeks to a schedule. The practical implication: if your slope requires a wall taller than a few feet, build permit and engineering costs into your budget from the start, not as an afterthought when a contractor mentions them.
What drives retaining wall installation costs
Each of these factors can move your project cost meaningfully. Understanding them before you request quotes helps you evaluate what you are actually being asked to pay for.
- Material type
- Sets the baseline installed cost and determines long-term maintenance and replacement needs.Timber costs less upfront but needs replacement far sooner than stone or concrete block.
- Wall height
- Taller walls require deeper footings, more material, and often trigger permit and engineering requirements.The four-foot threshold is a common trigger for engineering review in most municipalities.
- Drainage system
- Gravel backfill, drain pipe, and weep holes are structural requirements that add to the total scope.Clay-heavy or high-water-table sites require more robust drainage solutions.
- Excavation and backfill
- Rocky soil, steep grades, and limited equipment access all increase the excavation scope and cost.Material hauled off-site or brought in for backfill adds additional cost.
- Surcharge loads
- A driveway, building, or upward slope behind the wall increases lateral pressure and typically requires engineering at any wall height.This is one of the most commonly overlooked cost drivers in initial planning.
- Permits and engineering
- Walls above the local height threshold require engineered drawings, permit fees, and inspection scheduling.These are real budget and timeline items, not formalities.
- Site access
- Restricted access for equipment increases labor time and may require hand work or specialized machinery.Lakefront and steeply terraced sites are most commonly affected.
- Integration with adjacent elements
- Walls that connect to stairs, patios, or drainage outlets require coordinated design to avoid costly rework.Planning the full system before construction is more efficient than sequencing separately.
A wall built without adequate drainage behind it will eventually fail, regardless of how good the materials are.
How to think through your retaining wall project
- 1
Start with the site, not the material
Before choosing a material or requesting quotes, understand what your site actually demands. Measure the height differential the wall needs to hold, identify what is upslope (soil only, or a structure, driveway, or parking area), and note how water moves across the site after heavy rain. These site conditions determine the structural requirements, which in turn determine what materials and drainage systems are appropriate. Starting with aesthetics and working backward to engineering is a common and costly mistake.
- 2
Assess drainage before anything else
Walk the site after a significant rainfall and observe where water collects, where it flows, and whether the slope behind the proposed wall is likely to saturate. A wall built without adequate drainage behind it will fail, regardless of material quality. If your site has clay-heavy soil or receives significant runoff, factor a drainage system into your budget as a non-negotiable line item, not an optional upgrade. See how erosion control and drainage planning work together on sloped sites.
- 3
Match material to lifespan expectations
Consider how long you plan to own the property and what level of maintenance you are willing to accept. Timber is the lowest installed cost but requires replacement within roughly a decade and a half. Natural stone and quality concrete block systems can last 50 to well over 100 years with proper installation and drainage. If you are planning a broader outdoor living project around the wall, a backyard and patio design conversation is the right place to align material choices across the whole site.
- 4
Determine permit and engineering requirements early
Contact your local municipality before finalizing a design. If your wall will exceed four feet, or if it supports a surcharge load, engineering drawings and a permit will likely be required. Getting this information early prevents budget surprises and avoids the scenario where a contractor quotes a wall design that cannot be built as described without additional engineering. Some sites near regulated shorelines or wetlands have additional review requirements beyond standard building permits.
- 5
Plan the wall as part of the broader site
A retaining wall rarely stands alone. It typically connects to stairs, a patio, a planting plan, or a drainage outlet. Designing these elements together avoids the expensive rework that happens when a patio contractor arrives after a wall contractor and finds that the grades, drainage outlets, or footing locations do not align. If the wall is part of a larger outdoor living space project, plan the whole system before breaking ground on any individual piece.
Benefits
Material lifespan affects total cost
A lower installed cost does not always mean a lower lifetime cost. Timber walls that need replacement in 10 to 15 years require you to pay for excavation and labor twice, while concrete block or natural stone installations built correctly can last generations.
Height triggers a different cost tier
Walls over four feet tall typically require engineering drawings, permits, and inspections in most jurisdictions. These are real budget items, not formalities, and they should be included in any honest project estimate from the start.
Drainage is structural, not optional
Hydrostatic pressure from water-saturated soil is a primary cause of retaining wall failure. Proper drainage behind the wall (gravel backfill, a perforated drain pipe, weep holes) is part of the structural system, not an upgrade.
Site conditions move the number significantly
Rocky soil, limited equipment access, clay-heavy ground, and steep grades all increase excavation scope and complexity. Sites with these conditions consistently land toward the higher end of any installed cost range.
Integrated planning avoids expensive rework
A wall designed in isolation from adjacent stairs, patios, or drainage outlets often requires costly adjustments when those elements are added. Planning the full site system before construction begins is the most reliable way to control total project cost.
Situations where retaining wall costs get more complex
Steep backyard with a driveway above the wall
A homeowner with a sloped lot and a driveway sitting above the proposed wall faces one of the most demanding retaining wall scenarios. The driveway creates a surcharge load that increases lateral pressure on the wall significantly, often triggering engineering requirements regardless of wall height. The wall section needs to be heavier, footings deeper, and drainage more robust. This type of project almost always requires engineered drawings and a permit, and the installed cost reflects that complexity.
Lakefront property with erosion at the slope base
On a lakefront lot, a retaining wall may be needed to stabilize a slope above the shoreline, prevent soil loss into the water, and create usable outdoor space between the home and the lake. These sites often involve regulated shoreland setbacks and Wisconsin DNR permit requirements that add review time and constrain design options. The combination of slope, water proximity, and regulatory oversight makes lakefront retaining wall projects among the most involved in terms of planning and permitting. Coordinating the wall with shoreline restoration and lake access infrastructure is usually more efficient than treating them as separate projects.
Tiered walls to create a flat patio area
When a single tall wall would exceed permit thresholds or create too much lateral pressure, a common solution is to use two or more shorter tiered walls with a planting bed or step between them. Tiered walls distribute the load and can keep each individual wall below the engineering-trigger height, but they require more total material and more excavation than a single wall. The total cost is often higher than a single wall of equivalent height, though the structural and visual result is usually superior. Planning tiers in coordination with a patio contractor ensures the grades work for both the wall system and the finished surface above.
Replacing a failing timber wall with a longer-lived material
A homeowner whose pressure-treated timber wall is beginning to bow, lean, or rot faces a common decision: repair or replace, and with what material. Timber walls typically need replacement within 10 to 15 years, and replacement means paying for excavation and labor a second time. Upgrading to concrete block or natural stone at replacement time costs more upfront but eliminates the repeat expense. The calculation almost always favors the longer-lived material when total cost over the property's ownership horizon is considered.
Retaining wall prices: questions homeowners commonly ask
Ready to plan your retaining wall project with confidence
Understanding what drives retaining wall prices puts you in a much better position before your first contractor conversation. If your site involves a slope, drainage challenges, or a wall that connects to a patio or stairway, McGuire Landscape Company designs and builds these systems as a coordinated whole across Washington, Waukesha, and Ozaukee Counties. Reach out to start a conversation about your project.
Start your project conversation